
The most reliable way of connecting to the internet is an ethernet cable. And that’s why it is necessary to know how to connect ethernet cable to establish a connection to the internet or simply your home or office network.
In this post, I am going to explain all possible ways to connect an ethernet cable to different devices so that you can be online always no matter what!
To make sure this ethernet cable connection guide is the best you can find on the internet, I have covered everything from the easiest ways to the complex cross-platform connections using an ethernet cable.
Here’s everything you’ll learn in this ethernet cable connection guide.
- Connecting Ethernet Cable to Laptop
- Connecting Ethernet cable to Laptop without Ethernet port
- Connecting Ethernet cable to MacBook Pro / Air
- Connecting Computer to Router / Modem with Ethernet Cable
- Connecting Ethernet Cable to PS4
- Connecting Ethernet Cable to Xbox One
Pro Tip: To follow this guide, you can use any type of Ethernet cable available with you, but make sure its not a damaged one.
1. How to Connect Ethernet Cable to Laptop?
It is one of the most common and simplest questions about ethernet cable. Just follow these steps to connect your laptop to the internet using an ethernet cable.
Step 1: Find Ethernet Port on Modem/Router

Look for the correct ethernet port on your modem or router.
Generally, there are at least four ethernet ports on a gaming modem or router that allow you to connect up to 4 PC/laptops via ethernet cable.
Plug one of the ethernet cable into any one of these ethernet ports. Make sure the RJ45 connector is completely hooked in.
Step 2 – Connect to Laptop

Plug the other end of the ethernet cable into the ethernet port on your laptop.
For that, you need to find the ethernet port on your laptop. Most laptops (also called notebook computers) have an ethernet port on one of the sides.
The position of the ethernet port may differ depending on the brand and model of your laptop. Also, some laptops have the ethernet port labeled as “Internet” or have a connection sign on it.
Push the connector into the ethernet port on your laptop until you hear a click sound confirming that connector is fitted properly.
Step 3: Verify Connection

Verify the newly established internet connection on your laptop.
After connecting the ethernet cable properly from the router to your laptop, you can now verify if the internet has started working or not.
Most of the times, your laptop will automatically detect and connect to the internet once you have connected the ethernet cable properly.
To verify your ethernet connection on Windows OS, Open the Start menu and click the ‘gear’ icon to open the Settings.
Now, click the ‘Network & Internet’ and there you will see the status of your internet connection.
How to Connect Ethernet cable to Laptop without Ethernet port?
There are some laptop models that do not feature an ethernet port to make them thinner and more lightweight. Such laptops users generally rely on WiFi networks while some of them still ask if they can use an ethernet cable for internet connection.
The Answer is YES!
Here’s how to connect ethernet cable to Laptop without an ethernet port.
Step 1: Get a USB to Ethernet Adapter

To connect your laptop that does not have an ethernet port, you need to buy a USB to Ethernet adapter. This adapter uses one of the USB ports available on your laptop and allows you to connect an ethernet cable.
Step 2: Make the connections.

Connect the USB end of the adapter in the USB port on your laptop. Now, insert the ethernet cable into the ethernet port at the other end of the adapter.
Make sure the cable is secured properly in the ethernet port.
Once the connection is made, your laptop will automatically detect and connect you to the internet.
3. How to connect Ethernet cable to MacBook Pro / Air
We all know that Apple removed the RJ45 Ethernet port from the MacBook Pro as well as MacBook Air for obvious reasons. Still, there is a workaround to use an ethernet connection on both MacBook Air and MacBook Pro.
Here’s how to connect Ethernet cable to MacBook Air / Pro.
Step 1: Get a Thunderbolt to Ethernet Adapter

To connect MacBook Air and Pro via ethernet cable, you will require a Thunderbolt to Ethernet Adapter. This plug-and-play device uses the standard Thunderbolt port on your MacBook and kinda converts it into an ethernet port.
Step 2: Make the connections

You need to connect one end of the Thunderbolt-to-Ethernet adapter into the Thunderbolt port on your MacBook.
Now, insert the ethernet cable on the other end of the adapter that has the RJ45 Ethernet port. Make sure you push the connect inside until you hear a click sound.
Step 3: Verify Your Ethernet Connection
Click the Apple menu and select System Preferences. In the System Preferences window select the Network option.
You’ll see a New interface detected message. Click OK and Click Apply to save changes.
In the Network preferences window, select the Thunderbolt Ethernet interface and click Advanced. Now, configure your Thunderbolt Ethernet interface as suggested below.

4. How to Connect Computer to Router / Modem with Ethernet Cable?
Another common query about ethernet cables that I get a lot of times. Connecting a computer to a router or a gaming modem with ethernet cable are two different ways in which you can use wired internet connection.
Following are the steps to connect a computer to modem or router with ethernet cable.
Step 1: Find the Correct Port on Modem / Router


If you are using a Modem, then look for the ethernet ports at the back of the modem which are generally labeled as LAN 1, LAN 2, LAN 3 etc.
If you are using a Router, you will find a port labeled as ‘WAN’ or ‘Ethernet’.
Once, you have found the right ethernet port, connect one end of the ethernet cable into the port.
Step 2: Connect to PC

At the back of your CPU, check for the Ethernet port. Refer the image above to identify the same. It will look as same as the one you found on the back of your modem / router.
Connect the other end of the ethernet cable into the ethernet port on your CPU.
Now, your computer shall detect the ethernet connection. If not, just restart your computer and you should be connected to the internet automatically.
5. How to Connect Ethernet Cable to PS4?
Commonly, gamers use the built-in wireless adapter of PS4 to connect to the internet wirelessly. But, if you want better performance and no lag, you should opt for a wired connection using ethernet cable.
Below are the steps to connect ethernet cable to PS4.
Step 1: Plug In the Ethernet Cable to PS4
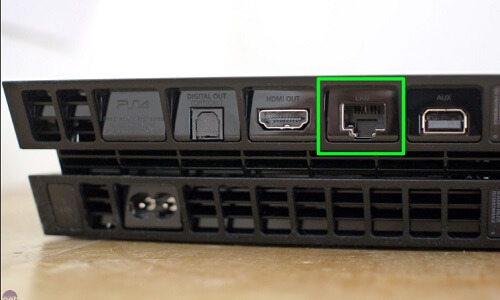
At the back of your PS4 console, there is an ethernet port. Refer picture above to identify the same. Plug one end of the ethernet cable into this port.
Now, connect the other end of the cable to LAN port on your gaming router.
Step 2: Configure the Connection
After connecting the cables properly, you need to configure your connection in PS4 settings. Follow the instructions to do the same.
Go to the main PS4 menu go to Settings and press X. Now, scroll down to Network and again press X.

Next, You will see two options – Use Wi-Fi and Use LAN cable. Select ‘Use a LAN Cable’ and press X.

On the next screen, make sure you choose ‘Easy’ and press X.
Now, your PS4 will display a message ‘Checking Network Environment’. Once it is done, you will see Internet Settings updated message.
That’s how to connect PS4 to internet using ethernet cable. Easy, right?
6. How connect Ethernet Cable to Xbox One?
Like the PS4, the Xbox One also allows you to use a wired connection using an ethernet cable instead of the wireless connection. If you do not know how to connect ethernet cable to Xbox One, here are the complete steps to do the same.
Step 1: Plug in the Ethernet Cable to Xbox One

To establish a wired ethernet connection to your Xbox One console, just insert one end of the ethernet cable in the RJ45 port on the back side of your console. Refer the image above to find it out.
The other end of the ethernet cable will go to the internet source which can be you gaming modem or router or the ethernet wall socket.
Step 2: Restart your Xbox One
After connecting both the ends of ethernet cable in their respective places, its time get the internet working on your Xbox One console.
All you have to do is to restart your Xbox One console. That’s not rocket science, still, you can follow the steps below.
First, Press the guide button on your Xbox one controller.
Now press the right bumper thrice to go to the System menu.

Select Restart console and on the following screen select Restart.
Once you Xbox one consoles reboots itself, the ethernet connection will be detected automatically and you don’t need to do any further configurations.
Final Words
Well, that’s all in this ethernet cable connection guide. I hope this has helped to learn how to use ethernet cable in different ways and with different devices.
If you still have any doubts about ethernet connection or you are facing issues while connecting ethernet cable, you can simply comment below. I will be happy to solve your queries at the earliest.
I promise that I will keep updating this guide with all the new ways of using ethernet cable. So, keep coming back to learn more and more!